Working at Twitch, I encounter Bob Ross (in meme form) several times a day. It was inevitable that, at some point, I would attempt some Happy Little Clouds™ on my own. There are numerous resources to learn Bob’s wet-on-wet painting technique (not the least of which is simply watching any episode of The Joy of Painting), but I found it hard to get pointers on all of the ancillary parts of painting — what to buy, how to set up, how to prepare your canvas, how to clean up, etc.
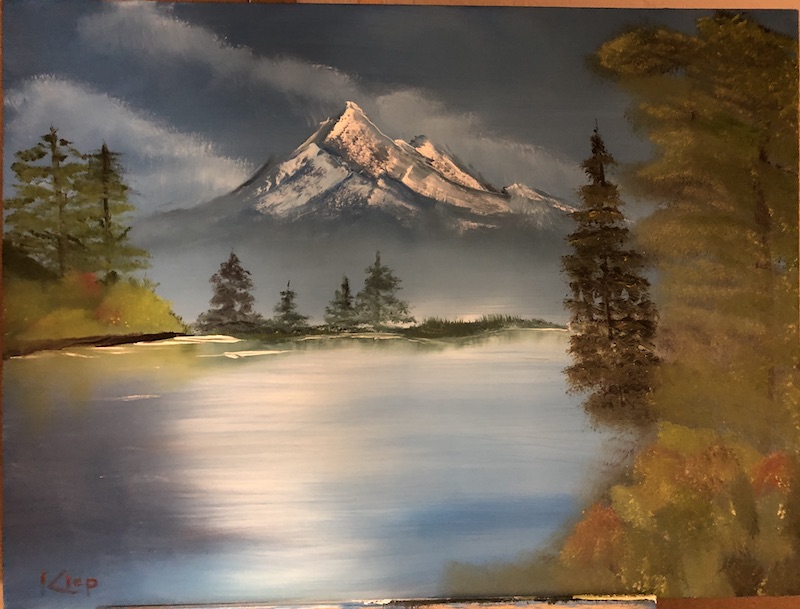
Now that I’ve completed a single painting, with some degree of success (I mean… you can tell that it’s supposed to be a mountain…), I thought I’d gather together all that ancillary knowledge for the next self proclaimed painter.
Supplies
There are a few ways to go about gathering the minimal set of supplies needed to determine if you have any artistic talent whatsoever. The idea is to avoid spending a lot of money until you have a sense of whether you’ll ever attempt this again. You could get the cheapest version of everything — the cheapest paint you can find, the cheapest brush you can find, etc., but I would recommend against that. The paints Bob uses are thicker and dryer than most oil paints. His effects are also very dependent on the brushes he uses. If you buy non-Bob Ross brushes and paints, you won’t know if your first painting came out poorly because you bought poor supplies or because you suck at painting need more practice.
Paints and Brushes: Get the Master Set
The Bob Ross Master Paint Set is the best deal in the Bob Ross Multiverse*. It includes a DVD with some background about the Bob Ross line of products, a single episode showing how to create a mountain landscape scene, and all of the brushes, knives, and paints required to paint the scene from the show. It also includes a small bottle of Liquid White, which you’ll definitely need. Purchased separately, even on sale, all those paints and tools would be easily $115 or more. The Master Paint Set is sometimes hard to find a good deal on, but I was able to get it at Jerry’s Artarama for $55. Currently, it looks like they have it for $69, which is still a fantastic deal.

I was a little concerned that these Master Sets might be leftover from the 80’s and I’d open the tubes of paint and they’d be reduced to powder. As it turns out, only the design of the box looks like it’s from the 80’s. These are actually still being made and, from what I’ve read, oil paints last forever in the tube anyway.
Your Canvas
Most of the other stuff is super easy to come by. You’ll need a canvas or two. I bought mine on sale at Michael’s, but I just bought a few more of these dirt cheap canvases on Amazon. They’re probably poor quality, but so is my painting. Ha! If you go looking for canvases elsewhere, you should look for ones that are stretched and double primed. The size Bob uses is 18″ x 24″, but you can use a different size if you prefer.
The Rest of Your Shopping List
You’ll need some Odorless Paint Thinner, both for cleanup and to thin down some of the paints because thin paint sticks to thick paint — remember? You’ll probably want to get some sort of bucket or brush cleaning system to hold the thinner.
Speaking of holding things, you need something to hold your canvas. Full size easels are expensive and bulky. Since I was only about 20% confident that I would ever attempt this again, I went with a tabletop folding easel. The downside of an easel like this is that you sometimes have to hold onto the canvas with one hand while you’re pushing on it with another. It’s also difficult to paint the very bottom of the canvas without lifting it up. If I had it to do all over again, knowing that I’d be inclined to do more than one painting, I might consider a full size easel.
You don’t necessary need a palette to do your first painting, but they’re cheap so you might as well. I got this plastic palette from Amazon. It gets the job done. It’s much smaller than the one Bob uses so there’s less room to mix colors. It’s also not ideal for lefties like me because one side has a lip around the edge and the other doesn’t. It turns out though that you don’t actually need to hold the palette while you’re painting. I ended up putting it down on a table next to me. You could also use a paper plate, which makes cleanup easier.
Other Supplies
That’s pretty much everything you need to buy. Before you start, you’ll also want to gather a roll of paper towels, a rag, and a trash bag. The trash bag can be used either to contain all of your used paper towels and oily rags or it can be used to hold the canvas after you snap it in half in frustration. Just kidding — it’ll be fine. Just channel your inner Bob.
I also suggest transferring the episode you’re going to be following along with to an iPad and putting it near you on a stand so you can easily pause and jump back and forward as you follow along.
What’s With Liquid White?

If Bob is doing a painting on what looks like a blank white canvas, he has almost certainly added a thin coat of liquid white. He says it so quickly you might miss it, but he always says it – We’ve got our canvas here with a nice thin coat of our liquid “hwite” [sic]. I wasn’t sure how much liquid white to use, so I did a YouTube search for “liquid white bob ross”. The consensus was clear, you use very very little of the stuff. The only tricky part is that if you start with a white canvas, it’s hard to see which parts are covered and which aren’t. Look closely — you’ll want good even coverage. Just brush it on and drag your brush up and down the canvas. Add more as you go. Once you’re all done, go back over it to get rid of any excess and cover any spots you missed. Then go left and right over the canvas very lightly to get rid of any brush lines. The YouTube videos I watched said that you should touch it with your finger and confirm that you can see your fingerprint in white on your hand. If you have too much white, you’ll just see a solid blob. If you have too little, you won’t see anything. I forgot to perform this test and everything was fine. In fact, this is a good time for a reminder…
Everything is Going to Be Fine

I was worried about a lot of stuff during my first painting. I thought that since I was going to so slowly, the paint would dry too quickly and it wouldn’t blend. Not true! The paint stays wet forever. Seriously, parts of it were still wet days later! The liquid white will stay wet the whole time you’re painting. Take your time! I also worried that if I messed something up, the whole painting would be ruined. Remember Happy Little Accidents™. When I finally mustered the confidence to show my first attempt to my wife, her praise was accompanied by a question — what’s that animal in the lower right? It was supposed to be a path, but I had to admit it was a particularly bad path. I took the painting back to the basement and covered up the path with some Happy Little Bushes™ and all was well.
I’m also reminded of the final episode of (I think) Season 1. Bob had his son Steve on to read some viewer questions. As he’s answering questions about mountains and trees, he illustrates his answers by doing a painting (natch). Then Steve reads a question about reflections and Bob is like I should have had you read that one earlier because the painting has no water. But Bob just puts in the reflections anyway and magically a lake appears out of nowhere. That’s the cool part of wet-on-wet. Because it’s still wet, you can always change it.
How To Get Set Up
I was really paranoid about my Liquid White drying up, so I made sure I had everything set up ahead of time. Now that you’re not worried about that (see above), you can get started at a leisurely pace. You probably want to squeeze out the colors you’re using onto your palette (not too much — you can always go back for more), add the Liquid White to your canvas, get your brush cleaning system ready, and set up your iPad.
You might also want to consider where you’ll be painting. I painted in the basement, which was a fine idea until I got paranoid that I had highly flammable paint thinner a few feet from the furnace. You might not want to go furnace-adjacent. I did, however, like the fact that my basement is so dirty that any paint splatter would be an improvement. If I were painting in the living room, I’d have to put down drop cloths.
Quirks of the Master Set
If you took my advice and bought the Bob Ross Master Paint Set, you may have noticed that some of the colors Bob uses in the episode aren’t included in the set. That’s intentional-ish. I’m sure it was to make the set cheaper, and it’s acknowledged in the written instructions that come with the set.
It’s important-ish to read the written instructions and keep them in mind (or re-read) while following along with the episode because it tells you what colors to substitute. I say important-ish because I totally forgot about the written instructions and when Bob said Prussian Blue, I looked at my palette and saw a blue color and used it, not realizing that was Pthalo Blue. While my painting had issues, it wasn’t really the colors that were the issue.
Tips from a Mediocre Artist
-
- One of the issues I had was when I opened a tube of paint, a lot of oil came out. By the time I got my last colors on the palette, I discovered that some combination of kneading the paint in the tube and dabbing the first bit out on a paper towel helped somewhat.
- Remember to thin our your paint if it’s not sticking. I did not remember to do this. My paint seemed super thin already. But I was having major issues getting the paint to stick and I kept picking up the color below. I’m almost certain that adding a bit of thinner or liquid white would’ve helped. I ended up with no highlights on my poor trees!
- I recently bought a whole bunch of brushes that didn’t come with the set, but I’m not convinced I really need them. Having watched a lot of episodes now, I’ve seen Bob do trees with the fan brush, the 2″ brush, the 1″ brush, and an oval brush. There’s no need to buy all of the brushes, though having a second one of the each of the brushes in the kit would be a good idea so you don’t have to clean/dry as much.
- Don’t over-mix your colors. Bob often leaves the colors “marbled” so that there’s some variability in the leaves or bushes or trunks or whatever. Much of the mixing is done on the canvas, not on the palette.
- I found Bob’s techniques almost as easy as he makes them look, at least in some cases. My first attempt a sky looked like a sky. The clouds weren’t quite as fluffy as I wanted, but they’re passable. Reflections and water are super fun to do and easy to make convincing. Really my only issue was trees. And highlights. And the path that looked like an animal of some sort.
Cleanup and Safety
Nothing brings Bob more joy than cleaning his brush. I was so looking forward to experiencing that same glee when whacking the devil out of my brush. Going in to it, I thought perhaps I’d get the wrist movement wrong. Not that case! What I got wrong was that my brush was only partially cleaned and totally full of highly flammable paint thinner and I just flung it all around the basement. After I toweled up the green specs from the floor and walls, I decided instead to dry my brush on paper towels.
I think this also contributed to the issues I had with my first painting. I don’t think I spend enough time getting all of the paint off my brush and drying the thinner off before going back into the next color. Again, I was worried that the paint would dry — which it totally wouldn’t have — so I rushed. Hopefully, I’ll avoid this next time by having more than one of each brush, and by taking the time to fully wash and dry them.
It was only once I was totally done with the painting that I realized that I had a bucket of highly flammable paint thinner in my basement and no idea how to dispose of it. You should determine your own comfort level in terms of safety, environmental responsibility, and ease of use. Some people say you should strain your used thinner through coffee filter and re-use it. Others say to bring it to a wooded area and pour it out. One guy said that he pours it on his walkway to kill weeds. Most responsible people say to collect it in a metal container and take it to a disposal center. Morons say to dump it down the drain.
Also consider all the paper towels and rags you used that are now soaked in highly flammable paint thinner. You’re going to want to put those somewhere dark and safe where they can be disposed of, and not, say left on the floor of your living room on a sunny day where they can ignite, destroying your house and your Happy Little Clouds™.
Where To Go From Here
I don’t know where to go from here. I just did one painting. To be honest, I think I might attempt the exact same one again and work out some of the issues I had.
When I’m ready to branch out, I might try one of the paintings where Bob uses Liquid Clear over a coat of Black Gesso.
If you’re looking for episodes to watch, you can find them on Twitch, YouTube, Amazon Prime, Hulu, or just about anywhere that streams video. I do highly recommend the painting they teach you in the Master Set for getting started though. It has all the fun stuff in one — a snowy mountain, clouds, water, reflections, trees, bushes, and a path (except mine, because I painted over my abomination of a path).
Happy Painting!
*The Bob Ross Multiverse includes the alternate dimension where Bob’s son, Steve, is bitten by a radioactive critter and continues to broadcast the show on PBS to this day. It does not include the Chia Bob Ross story arc, which is not considered canon.


Michael Kleper
Scott: Very well done both in execution and explanation.
Steve
The master set comes with a tiny bottle of liquid white, how do you get the paint on the brush? Can’t dip it since bottle is too small and it’s too liquid for palette right?
klep
Hi Steve — I just poured a bit out into a separate container and painted it onto the canvas.
Steve Warren
Great advice. Prefer to use though a non toxic cleaner such as lavender spike or zest. Maybe these options not on market when Bob painted. Any thoughts on this concern?
klep
Haven’t tried them, but sounds like potentially a better option!
Allan
I thank you for taking the time to write I really enjoyed it.
i have the whole set up and even taken a few .bob ross classes
your first picture is REALLY a great picture !
my wife’s paintings come out like Bob’s mine don’t but I enjoy the process and playing his dvd’s and painting along with him I have not painted in two years, hope my paints are still good, some come out really stiff and I add a little oil or thinner to it.
with the virus here I am going to set things up again partly due to you writing !
thank you again for your information and inspiration.
Sherry
Thank You for the very informative wisdom you had to share. I am about to start painting again, although it has been a few decades! Even Emily Carr didn’t start painting until she was in her 60’s. Which I am. Btw, I love your painting, and I don’t think the trees look that bad. Well, hopefully the artist in me remains!